Saturday, September 29, 2012

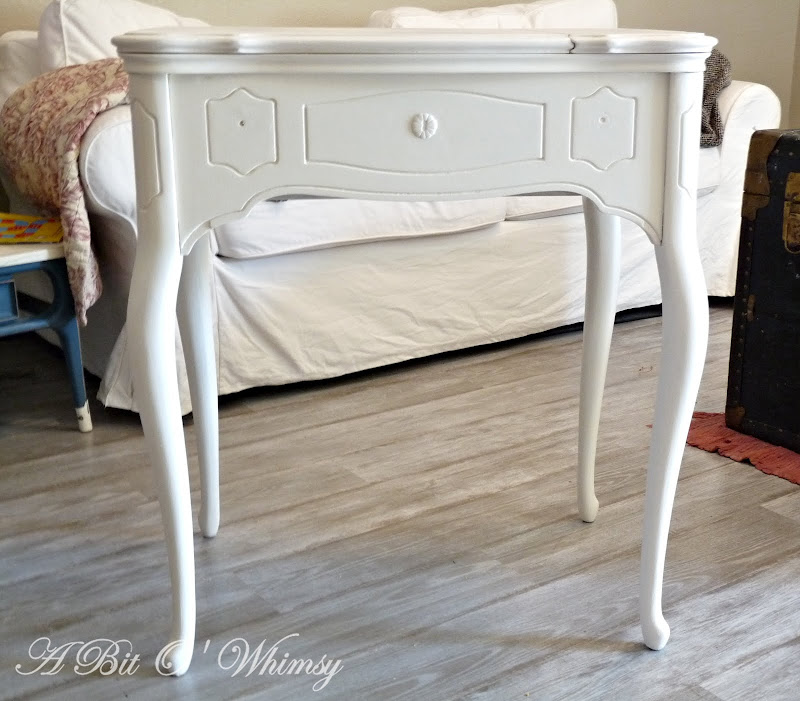
Antionette Sewing Table

Here's an easy, straight forward furniture makeover for ya this week. I see a lot of these fun sewing cabinets around still. I'm all about beautiful furniture with a function,  like hiding and storing your sewing machine. Just look at how this awesome table folds out for all that extra room and space for your projects. What a cool concept.

This one, however, will not be used for sewing, but as a beautiful table in a bedroom. The room is black and white with soft accents of pink. This is one of many I have done for one of my favorite clients :) I think I'm getting pretty close to having painted every piece of furniture in her home, ha ha. She has made a kind offer to let me come into her gorgeous home and take pictures when she's all finished. I think that sounds so fun.

This table was easy breeze, it was already restored and painted white, I simply applied the ballet slipper Antionette Chalk Paint. Once I had that color on I felt it needed some dark wax. It just felt like something for a little girls room. The dark wax brought age, patina, and some sophistication.


Jenine


Linking back to...
missmustardseed.com
www.funkyjunkinteriors.net

Sunday, September 23, 2012

Distressing with Candle Wax Tutorial

I always check the "oops" paint rack whenever I go into Lowes. I don't know why, since I'm usually a chalk paint lover, but I can't help myself. I love a good bargain. I ran across this minty green color and loved it enough to buy.  I'm not opposed to painting with latex, it usually is just harder for me to achieve a time-worn look that I love, and takes a little more work.

Today I want to share with you an easy and quick way to achieve an old look. This is by no means a new method, many people write and talk about it and have it perfected. I definitely haven't used it enough to have it "perfected"

Supplies
  • Candle wax (I used an old tea light I had around the house)
  • Latex paint color of choice
  • Sand paper about 120 grit, less (lower grit) if you want more distressing and a higher grit if you want less distressing
  • Electric sander or sanding block
  • Furniture wax or poly
  • Dark wax if desired
I had a table in my garage I picked up for free that I thought would work nicely for latex paint. It was already sanded and stained and had no protective shiny coating.

If your piece of furniture has a shiny protective coating, you'll have to strip/sand it off first. The paint won't stick to a shiny surface. I don't apply a primer to my pieces when I'm going for a distressed look. I don't want the white primer showing through my distressed areas and I don't mind if the paint eventually chips off in a few places, that's kind of what I'm going for :)

Once your piece is ready, take your candle and rub it on the edges and anywhere the paint would wear off naturally. The candle wax keeps the paint from sticking and can be easily sanded off. It also helps give it a more natural distressed look. Once you have your wax on the piece, go ahead and paint it.  You can just distress it by plain old sanding without the wax first, but I've noticed when working with latex paint it doesn't look as natural, especially when you use an electric sander. If you just use a sanding block it takes a ton of elbow grease to sand down to the wood layer.  I used an electric sander with the candle wax and it worked out great.

(A note of advice I learned the hard way: don't put your wax on outside in the hot sun, it will melt)

I just love the way the dark stained wood shows through. The dark contrast against the minty green kind of reminds me of mint chocolate chip ice cream, but maybe that's just because it was 97 degrees outside while I was painting it :)

I used some cool tricks to age the top of this table. My younger brother works for a reclaimed wood company and shared some tips with me. I'll be trying them out a few more times before I share it with you all.


P.S. I'll be selling this table in my shop and Etsy page, just contact me using my contact page button and I'll get back to you.

Jenine


missmustardseed.com
romantichome.blogspot.com

Friday, September 21, 2012

Oversized Ruler Growth Chart Giveaway!!

Hi everyone! I have never done a giveaway before, so I decided it was time for me to give it a shot. Enjoy!


What am I giving away?
One six-foot oversized ruler growth chart and shipping.  The buyer can choose whether they want it stained or painted, and which color they would like, and also if they want it distressed or not.  

When is the giveaway?
It begins right now!  The end of the period to enter is 12:01am Eastern Time on Friday, September 29th 2012.  I will randomly choose a winner and notify them within 24 hours 

How do I enter?
There are two requirements:  1) You must either be a follower of my blog (click 'join this site' over in the right sidebar) or have 'liked' A Bit O' Whimsy on Facebook here.  2) Enter your name and email address into that little widget below (or login with your Facebook account), then click '+1 Do It!' and then click the little green 'Enter' box that shows up. Got it? Good.

A few terms:
I will ONLY use your name/email to notify you if you've won.  You won't be added to any mailing lists or anything, and the list of names and emails will be discarded when the winner has been chosen and contacted.  I'm very sorry, but you are only eligible to win if your shipping address is within the 48 contiguous states of the US.  I don't think I can afford to ship to Europe or Hawaii.      

a Rafflecopter giveaway

Wednesday, September 19, 2012

Eclectic Chair Reupholstery

I had the opportunity to try my hand at reupholstering a few chairs for someone. I have never done it for anyone but myself, so needless to say I was nervous. I did repeatedly remind her I've never done this except for my own couches.


She said she started the chairs about a year and a half ago and just wore herself out working on them. She had quite a bit done on them so I thought it'd be easy breezy :)

The frame of the chairs was beautiful and classic, they even had their own natural distressing on the wood frame from age. It looked like they had been black and someone along the way painted them with an oil-based white paint that was worn through. She picked out a bold eclectic fabric, the kind that you either love or hate instantly. I loved it and it reminded me of something you'd buy from Anthropologie.


You'll notice there's a ton of nailhead trim, great look but not so easy. I found it was more difficult to pick up where someone had left off than to have started the project myself from the beginning. The old fabric was so old, crispy and sun damaged that it was torn off without having removed any staples. I'm sure it seemed like a great idea and way easier than taking every staple out, but it came back to bite my in the butt when it was time to add the nailhead trim. Every time I went to pound a nailhead in, it would hit a staple and bend a crazy way. I'd say every for every five tries only one of them would end up working out. Thank heavens she left me a ton of nailheads.  FYI, nailhead can be purchased in a strip where you pound in only one every 3 or 5, or you can buy them individually. The individual way means you must get spacing between each one exact, uniform, and very straight. I had the individual nailheads to work with.

Since the fabric had been ripped off, I also didn't have the advantage of the the old fabric to use as a pattern when cutting out the new material. There's no way I could have done this without the old fabric if they weren't fairly simple chairs. However, it was still difficult when cutting the fabric where the legs, seat, and top met.

Considering all the obstacles while finishing these chairs I think they turned out nicely. I live and learn from my experiences everyday.


Jenine


Linking back to...
missmustardseed.com
romantichome.blogspot.com

Tuesday, September 11, 2012

Annie Sloan Dark Wax Alternative!

I bought this dresser on Craigslist several months ago intending to use it for myself.  In the meantime, I found an armoire that fit my space and needs better. My husband tried to talk me out of buying this dresser, it needed a lot of work and could probably never be perfect again (Husband's note: It was also like 45 minutes away from our house and I had to drive there and back to get it :-/ ). It was priced so well that I couldn't pass it up despite all of its flaws.


The top of this piece was missing a large chunk. I wasn't too nervous about it, I'd replaced a top on a large buffet before. My plan was to pry off the layer of wood and cut a new slab of wood for the top. I got my pry bar out and it just wasn't budging :(  I chose to fill in the huge missing space with wood filler. It's not perfectly smooth but with a black painted top it's hardly noticeable. I will still be selling this dresser, but at a lower price because of the imperfection.

I want to share with you a brilliant "aha!" moment that I had. I was running low on my Annie Sloan Dark Wax, and my round waxing brush was also failing me. I only had it a week before the center 'hairs' of it just fell out, and then the whole head of the brush fell out. I wasn't real excited to buy a new one. I have to order my supplies and have them shipped. Sometimes it's a pain.  I was thinking of other waxing options. I usually use other brands of clear wax but how come no one had really made another brand of dark wax? (Not counting Miss Mustard Seed's new line)

I remembered my dad polishing his shoes with a dark wax in a tin every Sunday, and it had that same smell as A.S. Dark Wax.  Could it work?

Maybe you've already figured this out, but to me it was a new thought. I ran to Walmart to check out their shoe polish selection. I chose a black polish and a brown polish. I also noticed they had perfect brushes for waxing- short, soft, and even round. The best part was this stuff was cheaper and I had more selection. There were more colors to choose from. I realize that glazes come in different colors and I have used them over chalk paint before, but when I wash it off the wet rag sometimes it distresses the piece too much. I also prefer the way the wax looks more realistic and sticks to all the grooves.

My biggest concern was that when I went back over the shoe polish wax with the clear wax, it wouldn't wipe off the excess but it worked like a charm. I just followed the same steps I used with the Annie Sloan wax. 1. Clear wax 2. Dark wax (in this case, shoe polish) 3. Clear wax.

I hope this might open up some new options for you, or just gave you the courage to follow through on some ideas that you might be having. Let me know if any of you try it and how it works for you.


Jenine


Linking back to...
romantichome.blogspot.com
www.funkyjunkinteriors.net
missmustardseed.com

Wednesday, September 5, 2012

A Couple of End Tables

This past week has been an interesting one for me. Last Sunday I got in the car with me daughter to go to church, and my husband was running late and was going to take the truck later. When I got in my car, I noticed the contents of the glove box were all over the car; someone had broken into my car. I went inside to tell my husband, and he asked about the truck. I realize I didn't even check, so I go back outside and the truck is gone. They stole our truck! We've waited a week and a half now hoping it would show up on the side of the road or a parking lot somewhere. I'm starting to realize the longer it's gone, the worse shape it'll be in, if they ever find it. It was an old truck and we have no theft insurance. Bummer. It looks like I won't be picking up or delivering any large pieces of furniture for a little while :(

On the positive side, my husband was off of school all week last week so I wasn't stuck at home with no car. I was able to paint these cute end tables for a great client of mine.


Here are the before pictures. I especially loved the legs of both of these small tables. I really fell in love with the wood table and I even enjoyed the color of the wood on this one. I was asked to paint one in duck egg blue and the other in graphite to go with some previous pieces I had painted for her. Here they are finished, with just a smidge of distressing.

They're nothing too spectacular but they are just enough to add a little well worn character to a room.


Jenine

Linking back to...
romantichome.blogspot.com
missmustardseed.com