Tuesday, May 30, 2017

Antique Settee Reupholstery

I have a love hate relationship with reupholstering. It's just so tedious and time consuming. Please bear in mind that I am in no way a professional, I just enjoy knowing when I find an old dirty piece, I can take it home and make it usable again without breaking the bank.

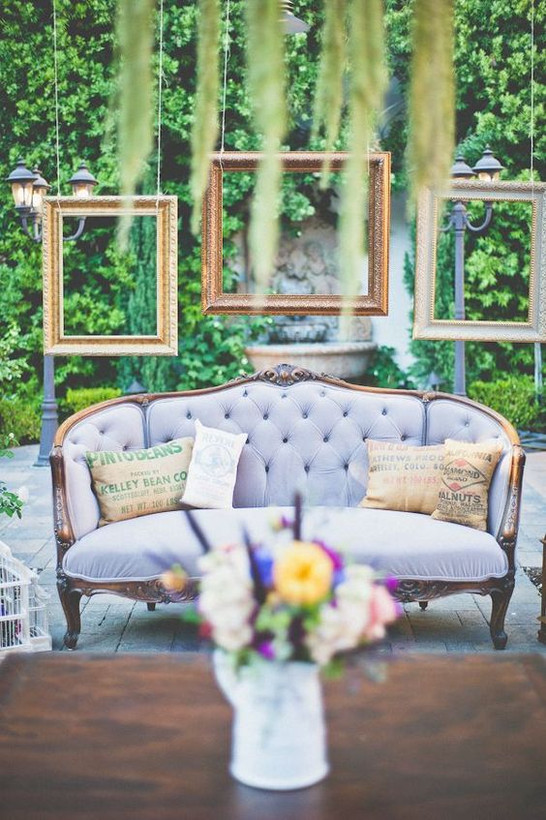
I found this Antique Sette on OfferUp. The seat was in good condition with no sagging. There  were some cracks and broken  structural pieces under the fabric. I had great faith that my hubby could fix those issues no swear. He used metal brackets to make the settee structurally sound again. I used a cream microfiber materiel with a french linen gray gimp trim and left the wood as is. This was an old piece with mohair and the works, it just felt wrong to paint the wood.

Tools needed:
- An air compressor and an pneumatic staple gun. I don't recommend doing this with a hand held stapler. They just aren't powerful enough and your poor hands will be so sore with the amount of staples you'll be using.I have any old air compressor I bought on craigslist and I use it for painting, filling car tires, and tons of jobs around the house. They aren't cheap but Harbor Freight hasgreat deal on air compressors and staple guns.

http://www.harborfreight.com/8-gal-2-hp-125-psi-oil-lube-air-compressor-69667.html

http://www.harborfreight.com/20-gauge-wide-crown-stapler-68029.html

- Staples, a lot of staples. I prefer longer staples, they are more secure. You can find these at any hardware store or even Walmart.

https://www.walmart.com/ip/ARROW-FASTENER-50624-T50-Staples/14962207

- Upholstery tack remover
Trust me you need this and it's so inexpensive. You will be removing thousands of nails or staples and your hands and sanity will thank you. You can try using a screwdriver for removing staples, this is fine for small jobs like kitchen chair. I found the screwdriver all leaves marks in your pieces wood frame, not ideal.

https://www.amazon.com/Great-Neck-TL4C-Tack-Lifter/dp/B00004Z2MI/ref=sr_1_3?ie=UTF8&qid=1493660870&sr=8-3&keywords=upholstery+tack+remover

- Fabric
It's best to go with a home decor fabric or upholstery fabric. Other fabrics are just too lightweight and will show wear quickly. Some of my favorite fabrics to use are linen drop cloths or soft crushed velvet's. Fabric can be the most expensive part of this process if you have a large piece of furniture. I always use a JoAnns coupon or shop the discounted home fabric section. Always make sure you have more than you need for mistakes. I use this chart to help me get the approx. amount.

https://www.creatingreallyawesomefunthings.com/f-r-e-e-upholstery-charts/

- Batting
I use batting to add a little extra cushion and to smooth out whatever is "stuffing" the piece has.

-Trim, Nail heads, or Cording
I usually opt for the trim or nail head route. Cording is what you see used most often and it great if you like to sew:) I like to use a gimp trim that I can glue on with hot glue. It is very durable. When it comes to nail head trim, I advise you to buy it in long strips. It makes the job so much easier, and there is no worry about getting the spacing correct, it's done for you.

- Hot Glue Gun and Glue or Rubber Mallet for Nail head Trim

I'm going to walk you through my basic steps and tricks for re upholstery.

1st- Know your limits. When I'm looking for a piece I know that my weakness is sewing, big time! Its just not my cup of tea. I try to look for sofas or chairs that don't have separate cushions that I have to sew covers for. Maybe you're great at sewing so it's a none issue. Awesome! That opens so many doors for you. I also know that tufting can be a huge pain so I try to steer away from that as much as possible. Also be weary of structural problems like sagging springs and broken wood frames.

2nd- Take photos of your furniture. This should really be done after every step if you're new to upholstery. When you get yourself in a pickle and you can't remember how something was put together you can go through your photos and have a look.

3rd- Consult with youtube. I try to find a video of a professional  reupholstering something similar to my furniture piece.

4th- Label every piece of fabric for example back, front, left arm, right arm, etc.

5th- Remove the fabric by taking out all the staples or nails

6th- Keep every piece of fabric you took off, this will be your pattern for your new fabric.Cut out new fabric using the old. Be sure to label the back off your new fabric so you know where it goes.Whenever I do this step I always think "I'll cut a little extra around the edges to give me some room for error". This usually causes me problems later on. I always end up with too much fabric and it causes it to bulge or wrinkle.

7th- Staple your new fabric on. I usually start with the bottom, front, back, then sides. I start in the middle of each fabric piece and work my way out to the edges.

8th- Use your trim to cover your staples

Hopefully, this was helpful and will inspire you to take on something that you might normally have to pass up on at the thrift store. Here is my end result, I'd love to see yours or hear your tips!


Sunday, April 30, 2017

The Very Beginning

    
      Growing up I lived on house on a big hill. Below was a gully of sagebrush, field grass and a beautiful river. It wasn't always a beautiful and wild place but used to be a literal dump.

       Over many years they covered this dump and built orchards and then one day houses. I  spent many hours with my friends building towns, and "homes", we could always manage to find some fragments of the past to add to our "homes". I remember finding old bottles and a tiny baby shoe. These felt like treasures to us. I remember the excitement when we'd find something great and I couldn't help but wonder who these things belonged to before us.

         I have grown up and moved away but I still enjoy looking for hidden treasure that others have left behind or thrown away. I love to see the potential and beauty in all things. I enjoy bringing things back to life and bringing them a new purpose. I enjoy fixing things that would otherwise be thrown into our dumps.

     I'm always out and about searching and I have found that my home is getting full. You only need so much after all. I can't see myself passing up an old piece of  furniture anytime soon. What's a girl to do? This is how my small business idea started. I am so excited to share my finds with you. Let me do all the searching, heavy lifting, and painting so that your special event can have A Bit O' Whimsy.

Jenine

Saturday, April 29, 2017

So You Want A Vintage Themed Wedding

You're getting married, congratulations! You're beyond thrilled and you've probably been hunched over your phone or laptop scouring every last drool-worthy Pinterest wedding idea out there. Am I right?

Well, when I told my family I had an idea to start renting out second hand furniture that I had found and painted for weddings, I'm not quite sure they got it. I get some pretty strange looks from people when I tell them what I do. If you're not a Pinterest lover, DIYer, or bride that's been planning this day ever since she can remember, you might not get it.

Either way, have no fear I am here to help you. You've a vague idea or dream about having a very stylish, unforgettable, one-of-a-kind wedding reception, but you have a limited budget and time. A Bit O' Whimsy has been painting, thrifting, and scouring the various online Craigslists and Offer Ups for you. No need to go out on your own to questionable strangers' homes. I have done that for you, lol.

Gather up your inspirational photos and let's get crackin'. Here are a few of my favorite photos of ways to add a vintage flair to your wedding.


 https://s-media-cache-ak0.pinimg.com/564x/68/dc/13/68dc13ef005b2d2ce569aad85274a318.jpg


Using furniture is a fun way to display an assortment of desserts for your guests. How fun is this baby blue color?


https://s-media-cache-ak0.pinimg.com/564x/98/07/b4/9807b43f0fcfb5f93b30cb65008ddf4b.jpg


Mirrors are a great way to add style. I love to see them used for fun sayings, menus, and seating charts. Try some window markers, dry erase markers, or even vinyl letters to customize for your event.


http://www.stylemepretty.com/gallery/subject/reception/2

I can't get enough of this! Who doesn't love an old rustic farm table with mismatched chairs? It reminds me of an Alice in Wonderland Tea Party.


https://www.theknot.com/real-weddings/a-vintage-rustic-wedding-at-big-spring-farm-in-lexington-virginia-album/? utm_source=pinterest.com&utm_medium=social&utm_content=oct2015&utm_campaign=real-weddings


There are so many new and creative ideas when it comes to guest books.  Why stop there when you can have it on something as cute as this old dresser?

 http://www.weddingchicks.com/gallery/rustic-backyard-wedding/

 Who doesn't want to show off their stunning Bridals or all those pictures you've stored up together on your phones ? What better way than to use an old dresser?

 http://chicvintagebrides.com/index.php/wedding-cake/1950s-inspired-wedding-cake-ideas/


Delicious Desserts and fragrant flowers pouring out  of the top drawer,  D-I-V-I-N-E. You could even make this buffet more functional and store some plates or cutlery.


 https://s-media-cache-ak0.pinimg.com/564x/13/b5/61/13b561836bffff28a0f8ac4f6b6b8c9b.jpg


If i could have a wedding again, my must have would have to be a luxurious lounge area. To me it's the ultimate show stopper. I'm a fan of making things fun and adding in some color with mismatched seating.


https://s-media-cache-ak0.pinimg.com/564x/83/41/6d/83416dba100168974016b8ca0a4f23f7.jpg

http://www.modwedding.com/2015/02/05/20-fabulous-wedding-reception-lounge-ideas/


What's your favorite way to add some vintage style to a wedding?
Don't forget to check out our ever-growing inventory to add a whimsical touch to your next event.

With Love,
Jenine

Saturday, August 10, 2013

Labor Of Love Cane Couch and Chair rescue

We have had an exciting week here in our home. we find out that we will be having a baby boy! Our 3 yr old daughter cried when we found out, she wanted a sister so bad. Her pouty frown and big huge tears almost made me cry. It's taken a bit of convincing but she has come around to the idea of a boy in the family.

I don't know if you remember this couch and chair, I shared the before pictures many months ago. I even had a few people ask about seeing the after pictures. This is just one of those projects that took me many of months. It needed to be cleaned and all the spiders evicted. We had to fix the arms that had fallen off and paint the frame I pulled off all the old material covering the springs, I even found that they had used horse hair for filling in places, yuck!


I needed some motivation. I am not the best seamstress so I was concerned about the cushion covers. I purchased new foam with a 50% off coupon at Jo Ann's and a floral and striped fabric from fabric.com. I originally thought I would have to learn to sew a cushion cover and zipper. This scared me to death.  I came up with another brillant plan to avoid learning any new sewing techniques! I decided I would save on fabric and stress if I made a fitted sheet cover, no zippers, just fabric and elastic. it fits perfectly and is easy to pull off and wash. I did the same for the chair. You'll notice the cane on the chair is covered, it had some large holes in it that needed to be covered. The baby doll in the picture is my daughters contribution:)


 It is such a dramatic change and it feels good to know you can buy something falling apart for near nothing at the thrift store and make it into something beautiful that can be enjoyed. I will not be keeping this but I hope it finds a home with a large covered patio for someone to just drink lemonade and enjoy the view.


Jenine

Tuesday, July 16, 2013

Paris Grey Armoire

I am well aware that it has been a good three months since I have posted about anything. I have a few very good excuses though. First, it has been up to 118 degrees here, not really painting-in-your-garage kind of weather.

The biggest reason I saved for last because it is the best. We will be adding our second child to our small family in January.  I am just finishing up the last few things I have stored in the garage, then I will be taking a nice long break while I am pregnant.

I have an armoire to show you. This was really cool the way it was, but was chipping and peeling and could only be saved by filling and painting over the damaged areas.

Here is the before
 After


If you're interested in purchasing this armoire, shoot me an email at the contact link above.  

Friday, May 3, 2013

Black and White Farm Table

Here's what I have been working on lately. I put a lot of sweat into this table. The top originally had a ton of peeling veneer. It took a lot of soaking, heating, and scraping to get it all off.

I fell in love with this table because of the unique and beautiful legs. I painted the base white to really show off their beauty.

The base in painted in Old white Chalk Paint and the chairs in graphite. I recovered the seats in black and white ticking and covered them in a plastic vinyl for protection. I have a kid, I know that the material wouldn't last one meal in my home without being ruined:)

The top has some splitting but I find it adds character. I used annie sloan dark wax to stain the top, it filled in all the knicks and dings and gave the top a real time worn appearance. I will be staining wood with dark wax  more often. It's all great for protection and waterproofing.


It is for sale ($250 just contact me at jenines1030@hotmail.com


Wednesday, May 1, 2013

Cane Couch Find

I came across this caned couch and chair at my local thrift store the other day. I looked at the price and it was too good to be true! I was so excited I bought it asap. I reupholstered my couch awhile back and didn't think twice about it before buying this fixer upper. I seemed to have forgotten that I am a horrible seamstress. For my own personal couch cushions I had my lovely sister in law sew the cushion covers.


It looks like I will be trying my hand at sewing once again, wish me luck!

My husband called this my "worst" purchase yet, he of little faith. I took it as a challenge. I have the set all painted, the arm is reattached, new foam for the cushions, and fabric just got delivered to my home yesterday.

Check back in the next week and see what I make out of this fixer upper.